To build your first program in CodeWorld, type (or just click on) this code:
program = drawingOf(codeWorldLogo)
If you type this and click the Run button, you'll see a drawing of the CodeWorld logo in the canvas on the right side of the screen.
!!! Warning: Did something go wrong? If you don't see the CodeWorld logo, don't worry. You can fix it!
Computers can be very picky, so make sure you have typed *exactly* what
you see above. That means everything needs to be spelled correctly, the
same letters need to be capitalized, and you need parentheses just where
they are. There should be nothing else in your editor except that one
line.
When you make a mistake, the computer usually shows you an *error message*,
which shows up on the right side of your screen in a pink shaded window.
These messages tell you what went wrong.

* If you see "not in scope", this means you have misspelled a word or
used the wrong capitalization.
* If you see "parse error", this can mean you've left out or have
extra punctuation marks or symbols.
Check your code carefully and try again.
If you have done coding before, you may have heard that code is like a recipe that tells a computer step-by-step what to do. In CodeWorld, though, code is more like a dictionary or glossary. It tells the computer what words mean.
Here's the code you just wrote and what its parts mean.
| `program`  | `=` | `drawingOf(` | `codeWorldLogo`     | `)` |
|------------|-----|--------------|---------------------|-----|
| My program | is  | a drawing of | the CodeWorld logo. |     |
programis the variable that you're defining. A variable is a name for something. Usually in math, variables are just one letter long and stand for numbers. In CodeWorld, though, variables can name many different types of values: numbers, pictures, colors, text, and even whole programs. Because you will use so many of them, you can name variables with whole words. There are some rules for naming variables. Most importantly, they must start with a lower-case letter and cannot contain spaces.
!!! collapsible: Camel case Sometimes, you may want more than one word to name a variable! Since variables cannot have spaces, you should leave them out and just run words together. To make it easier to tell when a new word starts, you can capitalize the second and later words.

In your first program, `drawingOf` and `codeWorldLogo` were written in
this way. It's often called **camel case**. Why? Because the variable
name has humps!
-
The equal sign means "is" and tells the computer that the two expressions mean the same thing. It is used to connect a variable with its definition.
-
drawingOfis called a function. You'll use functions a lot, and you'll learn more about them later! This particular function,drawingOf, tells the computer that your program is a drawing. Instead of playing a game or animation, it will just show a picture. -
codeWorldLogois the specific picture your program will show. Your computer already knows what the CodeWorld logo looks like, so this was an easy program to write. Most of your own programs will need to describe the picture that you want to show in more detail.
Of course, you can do a lot more in CodeWorld than just look at the CodeWorld logo! Next, you can build a digital nametag for yourself. To do this, you'll start by telling your computer that your program should be a drawing of a nametag. Type (or just click on) this code:
program = drawingOf(nametag)
This program doesn't work! When you click the Run button, you should
see an error message: Variable not in scope: nametag :: Picture.
This is your computer telling you that it doesn't know what nametag means!
!!! Tip: Run your program often! Even though your code was not finished, it didn't hurt to click Run. You can think of error messages as being a conversation with your computer. You're just asking what it needs next!
In this case, `Variable not in scope` told you that you need to
define `nametag`.  But if you typed something wrong, you might see
a different message, like `Parse error` or `Couldn't match types`.
These are clues that you have made a different mistake.  That's
okay too.  The sooner you know about the mistake, the sooner you
can fix it.

Did you notice that your computer already told you that nametag is a
picture?  It figured that out from context.  Because you asked for a
*drawing* of `nametag`, it is expecting `nametag` to be a picture.
This is just one more way the computer lets you know what it's thinking.
To finish your code, you'll need to define the variable nametag, and
describe to your computer exactly what a nametag is.
To start, you can add your name, like this:
program = drawingOf(nametag)
nametag = lettering("Camille")
You've used a new function: lettering. This function describes a
picture with letters (or any other kind of text) on it.
Next, you can add a border to your nametag. You might be tempted to add
a new line like nametag = ... to your code, but you can't! Remember,
your code is like a dictionary, and each definition in it should give
the whole definition for that word. To include a second shape in your
nametag, you'll use an operator, &, which you can read as "and" or "in front
of". To describe the border itself, two more functions -- circle
and rectangle -- are useful.
Here's a name tag with a border:
program = drawingOf(nametag)
nametag = lettering("Camille") & circle(4) & rectangle(8, 8)
Here are the shape functions you can use in your nametag, and the arguments (the information inside the parentheses) that each one expects.
| Function | Expected arguments (inside parentheses) | Example |
|---|---|---|
lettering |
Some text in quotation marks | lettering("Jenna") |
circle |
A radius--the distance from the center to the edge | circle(7) |
rectangle |
The width and height of the rectangle | rectangle(5, 3) |
Try these examples to learn more:
!!! : Concentric circles ~~~~~ . clickable program = drawingOf(nametag) nametag = lettering("Diego") & circle(4) & circle(5) & circle(6) ~~~~~
The `circle` function needs only a single number, which is the *radius*
of the circle.  Radius means the number of units from the center of
the circle to the outside.
!!! : Nested rectangles ~~~~~ . clickable program = drawingOf(nametag) nametag = lettering("Alyssa") & rectangle(6, 2) & rectangle(7, 3) ~~~~~
The `rectangle` function needs **two** numbers.  The first is how many
units wide the rectangle should be, and the second is how many units
tall it should be.
!!! : Overlapping rectangles ~~~~~ . clickable program = drawingOf(nametag) nametag = lettering("Karim") & rectangle(8, 2) & rectangle(7, 3) & rectangle(6, 4) & rectangle(5, 5) ~~~~~
Notice how the definition of `nametag` got too long?  It's okay to
start a new line, but you **must** indent the new line.  That is,
leave some blank spaces at the beginning.  If you forget to indent,
the computer will be confused and think you're defining a new
variable.  This can cause a `Parse error` message.
Once you've understood these examples, try changing the numbers or making other changes.
As you experminent with your programs, you're likely to try a few things that don't work. Explore these common error messages to understand what went wrong.
!!! collapsible: Parse error: naked expression at top level
This message means there's something in your program that doesn't look
like a definition.
If you wrote this:

~~~~~
program = drawingOf(nametag)

lettering("Jonas") & circle(5)
~~~~~

On the second line, instead of an *equation* to define `nametag`, this
program just wrote an expression.  Remember that your code is a
glossary, and everything in it should define a word.  To correct this
mistake you would add `nametag =` to the beginning of the second line.

~~~~~ . clickable
program = drawingOf(nametag)

nametag = lettering("Jonas") & circle(5)
~~~~~
!!! collapsible: parse error (possibly incorrect indentation or mismatched brackets)
This message can come from a missing indent.
For example, consider this code:

~~~~~
program = drawingOf(nametag)

nametag = lettering("Emma") &
circle(10)
~~~~~

Here, the programmer meant for `circle(10)` to be part of the
definition of `nametag`.  The computer doesn't understand this and
believes it should be a new definition, because it starts against the
left margin.  To fix this mistake, you would add a few spaces at the
beginning of the last line to indent it.

~~~~~ . clickable
program = drawingOf(nametag)

nametag = lettering("Emma") &
    circle(10)
~~~~~

This error can also tell you that you have an open parethesis -- **(** --
without a matching close parenthesis -- **)**.
!!! collapsible: Multiple declarations of nametag
This message tells you that you defined the same word in two different
ways. Sometimes this happens in human languages, and we call them
homonyms -- for example, "duck" could mean an animal, or it could mean
dodging a flying object! Your computer, though, can't deal with this,
so each variable can only be defined once.
Take a look at this program:

~~~~~
program = drawingOf(nametag)
nametag = lettering("Victor")
nametag = circle(10)
~~~~~


One line says `nametag` means a picture of the text "Victor", but the
second line says that `nametag` instead means a circle with a radius of
10.  Which one is it?  You probably meant for `nametag` to include both.
To do that, you would write one definition for `nametag`, and use
**`&`** to combine the parts.  Like this:


~~~~~ . clickable
program = drawingOf(nametag)

nametag = lettering("Victor") & circle(10)
~~~~~
!!! collapsible: Couldn't match type Program with Picture
Once you've got the hang of using & to combine pictures, you
might be tempted to use it everywhere!
For example, you might try to write this:

~~~~~
program = drawingOf(nametag) & drawingOf(border)

nametag = lettering("Miriam")
border = circle(10)
~~~~~

The problem here is that **`&`** can only combine *pictures*.  The
`drawingOf` function turns a picture into a *computer program*, and
you cannot use **`&`** to combine two different computer programs!

The solution here is to combine the pictures before using the
`drawingOf` function.

That looks like this:

~~~~~ . clickable
program = drawingOf(nametag & border)

nametag = lettering("Miriam")
border = circle(10)
~~~~~
!!! collapsible: Couldn't match type Picture with Text
Just like there's a difference between a computer program and a
picture, there's also a difference between text and pictures.
Consider this code:

~~~~~
program = drawingOf(nametag)
nametag = "Haruto" & circle(10)
~~~~~

The text, "Haruto", isn't a picture yet, so it cannot be combined
using **`&`**.  Use the `lettering` function to exchange the text
for a picture first, then combine it.

Like this:

~~~~~ . clickable
program = drawingOf(nametag)
nametag = lettering("Haruto") & circle(10)
~~~~~
Regardless of the message, you can always click on the line and column number next to an error message, and get straight to the location in your code where the error was recognized. (Be careful. Sometimes your actual mistake could be earlier!) So just read over it and double-check that you've typed what you intended.
In the nametags above, you defined variables called program and nametag.
Because your code is like a dictionary or glossary, you can define as many
variables as you like.
For example, you might write:
name = "Han"
age = 14
favoriteColor = blue
!!! Warning This isn't a complete program! If you try to run this example, you will see an error message:
`The variable program is not defined in your code.`

More on that later!
Each of these is a type of equation, which says assign the value on the right to the name on the left. You have seen this type of equation in math, often with variables x and y. For example, in math, you might see x=10 and y=20.
When you define a variable, you can use it in the rest of your code.
Look at this example:
program = drawingOf(nametag)
nametag = lettering(name) & circle(4)
name = "Guiseppe"
This code says that your program is a drawing of a nametag, that a nametag contains lettering of the name, and that the name is "Guiseppe". So "Guiseppe" is written on the name tag.
!!! Warning
Don't put quotes around a variable!
This code includes the expression lettering(name) without
quotation marks. What would happen if you write lettering("name")
with the quotation marks? You'd see a nametag with the word "name"
written on it. Oops!
Quotation marks tell the computer *not* to interpret something as code,
but only as a piece of text.  Variables are code, and you never put
quotation marks around your code.
You'll want to remember that defining a variable doesn't do anything by itself. Suppose you wrote this code:
program = drawingOf(nametag)
nametag = lettering("Chris")
border = circle(5)
If you run the code, you might be surprised to find there is no border!
You've told your computer what the word border means, but you didn't
say you wanted to use it in your program!
You might try this instead:
program = drawingOf(nametag)
nametag = lettering("Chris") & border
border = circle(5)
That extra & border tells your computer that you actually want a
border in the name tag. Defining it isn't enough.
Remember that defining a variable doesn't do anything by itself. But your code is nothing but a bunch of definitions, just like a glossary or dictionary! Then how does your code make any difference at all?
The answer lies in a special variable called program. Every CodeWorld
project needs exactly one definition for the program variable.
This is where the computer will look for a description of the program it
should run. Sometimes, like in the very first program you wrote, this
is the only definition you need. But usually you will use other
variables that the computer doesn't know in your definition of
program. When it sees these new words, the computer will look them up
as well. If their definitions use more words the computer
doesn't know, it will look up those words, and so on.
Remember: a definition only matters if the variable you're defining is
used, either directly or indirectly, in the definition of program.
That is, in the definition of program, or the definition of another
variable that's used in the definition of program, and so on.
!!! Tip: Warnings When you write code that is correct, but could be improved, you will sometimes see a warning. This is a message in the message area that lets you know about a problem, even though your program runs.
One warning you might see is `defined but not used`.  This warning
tells you that you've defined a variable, but it's not necessary,
because it isn't used (directly or indirectly) in the meaning of
that special `program` variable.
All of the code you've written so far has made use of functions. These are important tools you'll be using very often in your coding. Let's investigate them in more detail.
A function is a relationship that associates each possible argument or input with a specific result or output.
- input .----------. output
-
o------>| function +------>o - (arguments) '----------' (result)
The type of input a function expects is called its domain, and the type of result it produces is called its range.
Here's a list of the functions you've used so far, with their domains and ranges.
| Function | Domain | Range |
|---|---|---|
drawingOf |
Picture |
Program |
lettering |
Text |
Picture |
circle |
Number |
Picture |
rectangle |
(Number, Number) |
Picture |
(In addition to this, & is a binary operator. It's a kind of
function, too, but it looks different because it is a symbol rather than
a name.)
Applying a function means using the function to describe its result for
a specific input. To apply a function to some input, you write the name of
the function, an open-parenthesis, the input values (called arguments),
and then a close-parenthesis. When there is more than one argument to a
function, you can write the domain in CodeWorld by listing them all in
parentheses, separated by commas, like you see in rectangle in the table
above.
!!! Tip Parentheses always come in pairs and are used like a ring around the arguments to a function. Picture the name of the function at the beginning as adding a handle to that ring, forming something like a frying pan.

Go over some of the programs you've written up to this point and see if you
can see the frying pans for each function that you've used.
The way that you use a function in your code will depend on its domain and range. There's a type of short notation that's useful for stating the domain and range of a function. It looks like this:
drawingOf :: Picture -> Program
lettering :: Text -> Picture
circle :: Number -> Picture
rectangle :: (Number, Number) -> Picture
These lines, called type signatures, don't define the functions; they
just provide a little bit of information about what arguments they need
and what type of results they have. The two colons (::) should be read as
"has the type", while the arrow (->) denotes a function from one
kind of thing to another. So, the first line says "drawingOf has the type
"function from picture to program".
You can explore all of the functions the computer already knows when you use CodeWorld by pressing Shift-Space or Ctrl-Space on a blank line in the CodeWorld editor. Try it! The list gives all the names your computer already knows, and there are a lot of them! By typing the first few letters of the function you want, you can narrow down the list. The type signatures tell you what types of information you need to provide to apply the function and what type you can expect to end up with.
Important: The names of functions are reserved. That means you cannot use them as variable names. You would not be able to write program like this:
program=drawingOf(circle) circle=circle(5)
Wherease this would be okay:
program=drawingOf(myCircle) myCircle=circle(5)
For practice, see if you can write code using each of the following functions. Start by looking up their domain and range, using Shift-Space or Ctrl-Space, and see if you can use them with just that hint. If you need more hints, expand the sections below for an example and explanation.
!!! collapsible: solidCircle
~~~~~
solidCircle :: Number -> Picture
~~~~~
This type signature tells you that the only argument of `solidCircle`
is a number and that the result is a picture.

Here's an example of a program that uses `solidCircle`.

~~~~~ . clickable
program = drawingOf(pic)
pic = solidCircle(5)
~~~~~

You might have noticed that even though the type signature tells you
the input is a number, it doesn't tell you what that number means!
Type signatures just tell you the *types* of arguments needed to use
the function, not their meaning.  If you experiment, you may discover
that the argument is the radius of the circle.
!!! collapsible: solidRectangle
~~~~~
solidRectangle :: (Number, Number) -> Picture
~~~~~
This type signature tells you that `solidRectangle` needs two
arguments, both of them being numbers, and the result is a picture.

Here's an example of a program that uses `solidRectangle`.

~~~~~ . clickable
program = drawingOf(pic)
pic = solidRectangle(7, 3)
~~~~~

The first number is the width of the rectangle, and the second
number is the height.
!!! collapsible: thickCircle
~~~~~
thickCircle :: (Number, Number) -> Picture
~~~~~
This type signature tells you that `thickCircle` needs two arguments,
both of them being numbers, and the result is a picture.

Here's an example of a program that uses `thickCircle`.

~~~~~ . clickable
program = drawingOf(pic)
pic = thickCircle(5, 1)
~~~~~

Functions beginning with "thick" draw shapes with a thick line.  As a
general rule, the arguments to these functions are the same as the
arguments for the non-`thick` function, along with one extra argument
for the thickness of the line.  In this case, the first argument to
`thickCircle` (just like the first argument to `circle`) is the radius.
The second argument is the line thickness with which the circle is
drawn.
!!! collapsible: thickRectangle
~~~~~
thickRectangle :: (Number, Number, Number) -> Picture
~~~~~
This time, the type signature tells you that `thickRectangle` needs
three arguments, a new record!  All three arguments are numbers, and
the result is a picture.

Here's an example of a program that uses 'thickRectangle`.

~~~~~ . clickable
program = drawingOf(pic)
pic = thickRectangle(8, 4, 1)
~~~~~

The first two arguments are the width and height of the rectangle.
The third and final argument is the thickness of the line to draw it
with.
!!! collapsible: codeWorldLogo
~~~~~
codeWorldLogo :: Picture
~~~~~
This was a trick question: `codeWorldLogo` isn't a function at all!
It still has a type signature, but there is no arrow, because it's
just a picture.  That means there are no parentheses after it, and it
has no arguments.

~~~~~ . clickable
program = drawingOf(pic)
pic = codeWorldLogo
~~~~~

This is the same program as the very first one you wrote!
As you continue with CodeWorld, you'll learn a few more functions. For now, see if you can spruce up your nametag with some thicker lines. Try some solid shapes too and think about whether they are useful for creating your nametag.
The nametags you built in the last section were pretty cool! Still, they had some big limitations. First, they were black and white. Colors would make them much more exciting. Second, all the shapes were in the center of the screen. You can fix both of these problems using transformations.
A transformation is a function that turns one picture into a different one. It receives as its arguments:
- a picture called the preimage
- more arguments describing what to chage about it
The result of the transformation is a new picture, which is like the preimage except for that change.
-
.----------------. - preimage o--->| |
-
| transformation +---->o result - changes o---->| |
-
'----------------'
You can use transformations to make several kinds of changes to your pictures. Here, we will look at five different transformations: coloring, translation, rotation, dilation, and scaling.
The first transformation you will use is coloring. The colored function
changes (transforms) the color of a picture. This function expects two arguments: the preimage, and a new color. The colors of the preimage don't matter at
all -- only the shapes involved. The result of the colored function is a new
picture, which is just like the preimage, except for the different color. It has been transformed!
program  = drawingOf(redWheel)
redWheel = colored(wheel, red)
wheel    = solidCircle(4)
Try that out. To help you understand it, let's take a closer look at this program by asking and answering a question.
!!! collapsible: What does the picture named wheel look like?
It's a filled-in circle of radius 4, drawn in black.
<div align="center"><iframe src="https://code.world/run.html?mode=codeworld&dhash=DrYNeySBqPKubPkzT48dTEA" width=250 height=250 style="border: none;"></iframe></div>

Surprised?  If so, this is a good chance to review what a
transformation does and doesn't do.  The equation
`redWheel = colored(wheel, red)` defines a variable called
`redWheel`, which is a picture that is just like `wheel`, except
drawn in red.  The new variable, `redWheel`, is colored red like
you expected, but that *doesn't* change the meaning of the other
variable, `wheel`.  Remember that `redWheel` and `wheel` are
different pictures.

The final program draws a wheel in red, because you defined the
**program** to be a drawing of `redWheel`.

Can you guess what the result of this code is?

~~~~~ . clickable
program  = drawingOf(wheel)
redWheel = colored(wheel, red)
wheel    = solidCircle(4)
~~~~~

If you ran this, you would see a black circle. `redWheel` is still
defined to be a red circle.  However, `program` is defined to be a
drawing of `wheel`, which is still black.
When you use colored in a program, a whole expression like
colored(pic, blue) describes a picture, so you can use an expression
like this in all the same places you could use any other description of
a picture.
For example, you might define nametag like this:
program = drawingOf(nametag)

nametag = colored(outerBorder, blue) &
          colored(innerBorder, green) &
          colored(name, red)

outerBorder = thickRectangle(15, 15, 1)
innerBorder = thickCircle(6, 1)
name        = lettering("Winona")
Since colored(outerBorder, blue) is an expression that describes a
picture, you can combine it with other pictures using &, just
like you could with circle(5), rectangle(3, 4), or any other
picture expression.
Here is a table of colors you can use.
| red | yellow | green | blue |
| orange | purple | pink | brown |
| white | black | gray |
!!! Tip
Why would you ever use the color white, when the background
color in CodeWorld is already white?
Although the background in CodeWorld starts out white, you can
use a large colored shape to change the background to some other
color.  Then a white shape in front of that color would be
visible.

~~~~~ . clickable
program  = drawingOf(nametag)
nametag  = colored(label, white) & colored(backdrop, purple)
label    = lettering("Hashim")
backdrop = solidRectangle(20, 20)
~~~~~

If you do this, remember that **`&`** means "in front of", so
the shape in front should come first, while your backdrop should
come last.
The second transformation you can use in your programs is translation. The
translated function shifts a picture up, down, left, or right. Its inputs
are the preimage, and two distances to move the picture. The result of the
translated function is a new picture with the same content as the preimage, but
shifted either horizontally (that is, left or right) or vertically (that is,
up or down) or both.
When you give distances to the translated function, you will list the
horizontal change first, and the vertical change second.
A useful tool for finding these numbers is the coordinate plane.

!!! Tip: Get your own coordinate plane The coordinate plane is a picture that your computer knows about in CodeWorld.
To make your own coordinate plane, use this code:

~~~~~ . clickable
program = drawingOf(coordinatePlane)
~~~~~
This tool is a combination of two number lines.
- The first number line is the x axis. It is horizontal, with positive
numbers to the right and negative numbers to the left. You can use this line
to describe how far left or right to move a picture. - The second number line is the y axis. It is vertical, with positive numbers on top and negative numbers on the bottom. You use this number line to describe how far up or down to move a picture.
The basic shapes you have learned are drawn with their center at the origin -- the point (0, 0) -- on the coordinate plane, so you should measure your x and y distances from there. As you define your own pictures, it's a good idea to continue this practice.
To see a circle with radius 5 drawn on the corrdinate plane, use this code:
~~~~~ . clickable
program = drawingOf(coordinatePlane & circle(5))
~~~~~
Suppose you wanted a circle representing the sun in the top left corner of the screen. First, you could look at the x axis, and see that negative numbers are used to move a shape to the left. You might pick -5, which is five units left on the screen. Next, you could look at the y axis, and see that positive numbers are used to move an object up. You might pick 7, which is most of the way to the top of the screen.
The expression describing a picture of the sun in the right place is now
translated(sun, -5, 7). The first argument is the preimage, which you
would define elsewhere in the program. The second and third arguments are
the distances to move the shape in your new picture, with horizontal first,
then vertical.
Here is a complete program:
program = drawingOf(pic)
pic = translated(sun, -5, 7)
sun = solidCircle(2)
!!! collapsible: What if you only wanted to move the preimage to the side?
Functions always need the same number of arguments! The translated
function expects three of them, so you must give all three arguments
to use it.
If you only want to move the preimage in one direction, use zero (`0`)
for the other direction.  For example, `translated(sun, 0, 5)` describes
the sun at midday.  It has still been moved up, but not at all to the
right or left, because the second argument is zero.
!!! collapsible: What does translated(pic, 0, 0) mean?
Just for fun, what happens if you use zero for both distances? Think
about it!
If you do not move the picture in either direction, then the result is
the same as the preimage!  That is, `translated(pic, 0, 0)` is another
expression that describes the same picture as `pic`.  It makes no
difference to the computer which expression you use.
You now know seven different functions for building shapes, and two transformations. Your CodeWorld vocabulary is growing. Here's a summary of what you've seen so far.
Basic shapes:
circle :: Number -> Picture
solidCircle :: Number -> Picture
thickCircle :: (Number, Number) -> Picture
rectangle :: (Number, Number) -> Picture
solidRectangle :: (Number, Number) -> Picture
thickRectangle :: (Number, Number, Number) -> Picture
lettering :: Text -> Picture
Transformations:
colored :: (Picture, Color) -> Picture
translated :: (Picture, Number, Number) -> Picture
And a couple plain pictures:
codeWorldLogo :: Picture
coordinatePlane :: Picture
Using these building blocks, you can build your own creative pictures. Coloring and moving shapes really opens up the possibilities. You might try:
- Using more solid shapes, now that they aren't stuck covering the center of your picture. You can color them and move them around.
- Placing a large solid colored shape, a backdrop, behind your picture
(using
&) to change the background color. Remember that when you use&, the first picture goes in front, so keep your backdrop at the end! - Even applying more than one transformation--such as a coloring and a translation, starting from one preimage.
You will define a lot of variables as you work. To draw a sunset, you might write something like this.
program = drawingOf(sunset)

sunset = translated(greenGround, 0, -5) &
         translated(orangeSun, 0, 2) &
         blueSky

orangeSun = colored(sun, orange)
sun = solidCircle(3)

greenGround = colored(ground, green)
ground = solidRectangle(20, 10)

blueSky = colored(sky, blue)
sky = solidRectangle(20, 20)
See if you can describe exactly what each name means, and then check your answer by changing the definition of program to draw that variable by itself. Understanding the meaning of each of your variables is how you get better at programming!
!!! Note: Challenge -- Make your own emoji! Using your skills, can you invent your own emoji? Try a solid yellow circle for the face, and then arrange smaller circles and rectangles for eyes, a nose, and mouth, and anything else you like! Rectangles for hair? Circles for glasses? Go wild!
The next transformation to try is turning a picture. Turning is also
called rotation, so this third transformation is done with the rotated
function. The rotated function needs two arguments: the preimage, and an
angle to rotate (or turn) it. Because rotated is a transformation, the
result is a new picture that is just like the first, except that it has
been rotated.
To guide yourself in thinking about rotations, imagine a protractor, like this one.

As you can see, a fourth of a turn is 90 degrees, and half a turn is 180 degrees. Positive angles represent turning the picture counterclockwise. To turn the picture clockwise instead, use a negative angle.
!!! Warning It might seem a bit backwards that counterclockwise turns are represented by positive angles. Yet, this is how mathematicians usually measure angles. Pay attention, and don't let it fool you.
If you think about it, a diamond could just be a square, turned a bit to the side so that its edges are diagonal. Here's some code that describes a diamond in this way.
program = drawingOf(diamond)
diamond = rotated(square, 45)
square  = solidRectangle(4, 4)
You can probably think about a lot of other pictures you can draw using rotated rectangles, lettering, and more.
!!! collapsible: What happens if you rotate a circle? If you rotate a circle, you won't notice any difference at all! That's because a circle looks the same in all directions. Mathematicians would say that a circle has rotational symmetry. What that means to you is that you should save your rotations for shapes where it matters!
!!! collapsible: Can you rotate and translate a picture? Yes, but the result might surprise you!
When you rotate a picture, it's rotated around the *center* of the
picture.  Translation can move the shapes away from the center.  Consider
this code.

~~~~~ . clickable
program = drawingOf(rotatedBox)
rotatedBox = rotated(translatedBox, 60)
translatedBox = translated(box, 7, 0)
box = solidRectangle(2, 2)
~~~~~

<div align="center"><iframe src="https://code.world/run.html?mode=codeworld&dhash=DTtRwAtzs4VAQep7g74-9dQ" width=250 height=250 style="border: none;"></iframe></div>

Are you surprised to see the box way up near the top of the screen,
when it was only translated to the right?  The explanation is that the
picture `translatedBox` was rotated around its *center*, but the box
itself is at the edge.  The diagram below might help to understand what
happened.

<div align="center"><iframe src="https://code.world/run.html?mode=codeworld&dhash=D3uSuTWTC5QgGdXMrh290uA" width=250 height=250 style="border: none;"></iframe></div>

To avoid this, consider rotating the shape first, and then translating
the rotated shape.

~~~~~ . clickable
program = drawingOf(translatedBox)
rotatedBox = rotated(box, 60)
translatedBox = translated(rotatedBox, 7, 0)
box = solidRectangle(2, 2)
~~~~~
Another transformation that you can use is reflection, which flips the
picture over some line. The resulting picture is backwards, as if viewed
as a reflection in a mirror. This transformation is done with the
reflected function. This function needs two arguments: the preimage,
and an angle for the line of reflection (the line you're reflecting the
picture across).
Use the same protractor as you did for reflections to choose an angle for the line of reflection. For example:
| Angle | Effect |
|---|---|
0 |
Line of reflection is horizontal; picture flips top to bottom. |
90 |
Line of reflection is vertical; picture flips left to right. |
45 |
Line of reflection is diagonal; picture flips top-left to bottom-right. |
You can use this to draw the CodeWorld logo backwards, like this:
program = drawingOf(backwardLogo)
backwardLogo = reflected(codeWorldLogo, 90)
!!! collapsible: Why does the picture flip horizontally when the angle is 90 degrees? On the protractor, the 90 degree mark points up. You might be surprised that the picture flips horizontally, not vertically!
The key to this puzzle is that the angle defines the *line* *of* *reflection*.
The picture flips *across* that line.  So if the line of reflection is vertical,
then the picture will flip from left to right.

This animation shows the line of reflection and the flipping, and may clear it up.

<div align="center"><iframe src="https://code.world/run.html?mode=codeworld&dhash=DkVZbEJpBVW64qwAGbfamGg" width=250 height=250 style="border: none;"></iframe></div>
!!! Note: Translation, rotation, and reflection make congruent pictures. In geometry, two shapes are called congruent if they have the same side lengths and angles, but might differ in the location or orientation of the image. All of the last three transformations: translation, rotation, and reflection, produce congruent pictures. In fact, these are all of the transformations you ever need to turn an image into any other image that's congruent to it.
Yet another transformation is used to change the size of a picture.
Changing size is also called dilation, so this transformation is done
with the dilated function. This function needs two arguments: the
preimage, and a scale factor. The scale factor says how much larger or
smaller the result should be. For example:
| Scale Factor | Result |
|---|---|
2 |
Twice as large |
3 |
Three times as large |
1/2 or 0.5 |
Half the size |
1/5 or 0.2 |
One fifth the size |
1 |
The same as the preimage |
Here is an example of a program using the dilated function.
program = drawingOf(poem)
poem = translated(firstLine, 0, 1) & translated(secondLine, 0, -1)
firstLine = dilated(asBig, 5)
secondLine = dilated(asAMouse, 1/2)
asBig = lettering("AS BIG")
asAMouse = lettering("as a mouse")
Some functions you've used to build shapes--like rectangle or
circle--already have arguments you can use to control their size.
It makes no difference whether you use the dilated function to resize
these shapes, or just build the picture larger in the first place. So
circle(6) is the same picture you'd get by dilating circle(3) by a
scale factor of 2, and rectangle(1, 2) is the same picture you'd get
by dilating rectangle(2, 4) by a scale factor of one half. But other
functions, like lettering, don't give you the same choices. If you want
smaller or larger letters, dilated is the way to go. As you build up
other more complicated pictures, dilation also comes in handy to resize
the whole picture at once, so you don't have to change each piece
separately.
!!! collapsible: How does dilation combine with rotation and translation? Rotation and dilation are independent of each other. In other words, if you rotated and then translate a shape, you get the same result as translating and then rotating.
Some extra care is needed to combine dilation with translation, though.
Just like rotation always rotates around the *center* of a picture,
dilation always resizes away from or towards the *center*.  That means
shapes in the center of a picture remain in the center, but a shape
that is away from the center is pushed further away from (if the picture
is getting larger), or pulled toward (if the picture is getting smaller)
the center.
!!! collapsible: What happens if you dilate by a negative number?
Dilating by a negative scale factor reflects your picture across the
origin, (0, 0); meaning that each point on your picture moves to the
opposite side of the origin. This is actually the same as turning your
picture upside down! In other words, dilated(pic, -1) is always the
same picture as rotated(pic, 180).
!!! collapsible: What happens if you dilate by zero? Dilating by a scale factor of zero makes your picture disappear! Think of dilation as being like multiplication. If you dilate by 1 (just like if you multiply by 1), you don't change the picture at all. If you dilate by 0 (just like if you multiply by zero), the whole picture goes away, and you have nothing left.
This is different from rotation or translation, which are are like
adding, rather than multiplying.  Rotating or translating by 0 doesn't
change the picture.
!!! Note: Translation, rotation, reflection, and dilation make similar pictures. In geometry, two shapes are called similar if they have the same angles between sides, but might differ in the distances, location, or orientation of the image. This is a weaker statement than being congruent: congruent shapes are also the same size, while similar shapes can be different sizes. All of the last four transformations: translation, rotation, reflection, and dilation, produce similar pictures. In fact, these are all of the transformations you ever need to turn an image into any other image that's similar to it.
Scaling is used to stretch or flip a picture. The scaled function needs three
arguments: the preimage, and two different scale factors in the horizontal and
vertical directions. If the two scale factors are the same, then scaling is
just like dilation. But when they are different, scaling lets you stretch a
picture in one direction more or less than the other.
program = drawingOf(ellipse)
ellipse = scaled(base, 2, 1/2)
base    = solidCircle(4)
This program shows a drawing of an ellipse, which is just a stretched-out circle. You can also stretch other shapes, and even letters and other pictures that you define yourself.
!!! collapsible: How are the scale factors different between scaled and dilated?
The scale factors in the scaled function work much the same way as they
do for dilated--just in one direction at a time. A scale factor of 0
still produces a blank picture, and 1 still leaves the picture
unchanged. Numbers larger than one stretch the picture larger, and
numbers smaller than one squishes the picture to be smaller than the
preimage.
For any values of `pic` and `k`, `dilated(pic, k)` is the same as
`scaled(pic, k, k)`.  The extra power of the `scaled` function is that
you can choose different scale factors in different directions.
!!! collapsible: What happens if you scale by a negative number?
A negative scale factor in one direction will reflect the preimage in
that direction. In other words, scaled(pic, -1, 1) is the same as
reflected(pic, 90) (it reflects across the y axis), and scaled(pic, 1, -1)
is the same as reflected(pic, 0) (it reflects across the x axis).
If you scale by a negative scale factor in both directions, this reflects
across the x and y axes at the same time.  This is sometimes called a
reflection across the origin.  It's also the same as rotation by 180
degrees.  You can try this with a card or slip of paper: if you flip it
horizontally, then flip it again vertically, it ends up in the same
position as if you'd turned it 180 degrees.
!!! Note: The scaled function doesn't produce congruent or similar shapes.
Unlike the earlier transformations, scaled pictures are not necessarily
either congruent or similar to the preimage. They can be, but only if
the magnitudes of the scale factors are the same.
You've now seen many of the basic functions you need to describe pictures with mathematics, and draw them in CodeWorld. In this section, you will learn more about how these pieces fit together to build artwork that is as elaborate and complex as you like.
You have been using expressions already, as you wrote your first code. An expression is the code or notation you use to describe a value such as a picture, number, color, or program. Here are some examples of simple expressions.
| Expression | Type of value |
|---|---|
drawingOf(nametag) |
Program |
codeWorldLogo |
Picture |
circle(4) |
Picture |
translated(sun, -5, 7) |
Picture |
colored(wheel, red) |
Picture |
circle(8) & circle(9) |
Picture |
blue |
Color |
1/2 |
Number |
2 |
Number |
"Sofia" |
Text |
Every expression has a type, which is the kind of thing that it
describes. The simple types you've worked with so far include
Program, Picture, Color, Number, and Text. These types
are used in the domain and range of the functions you use for
programming.
To learn more about the kinds of expressions you can write in CodeWorld, explore the topics below.
!!! collapsible: Literal expressions For some types, like numbers, text, and colors, you can write values directly as a simple kind of expression. These are called literal expressions.
Literal expressions for numbers can be whole numbers, like
`5` or `-1`, or they can be decimals, like `1.5` or `3.14`.
You can also write fractions, like `1/2`, as just a number,
too, although this isn't *exactly* a literal; it's actually
dividing two other numbers.

Text also has literal expressions.  A literal expression for
text is written in quotation marks.  Your name, in the nametag
program you wrote earlier, is an example.

Finally, common color names like `blue` and `green` are
literal expressions, too.
!!! collapsible: Variables
A variable is another kind of expression. Variables are
names the computer already knows, or that you have defined
elsewhere, that represent a value. Some of the variables
you have used as expressions are codeWorldLogo (which is
a known picture) or nametag (a picture that you defined
elsewhere in the program).
Most of the time, variables that are already known to the
computer act about the same as literal expressions.  As you
learn more advanced techniques, the difference will become
important.  In CodeWorld, you can always tell the
difference because variables start with lower-case letters.
(In mathematics outside of CodeWorld, variables are mostly
lower-case letters, too, but it's not a hard and fast rule.)
!!! collapsible: Function applications Most of the expressions you've written so far have been function applications. These expressions are written with the name of a function to apply, followed by parentheses, and inside the parentheses the arguments for that function. The value described by the whole expression is the result of that function when it's given those arguments.
!!! collapsible: Operations
Finally, you've written some expressions that are operations.
Some operations are 2 + 2, or codeWorldLogo & coordinatePlane.
An operation is written with the first value at the beginning,
an operator in the middle, and a second value at the end. You
can continue and chain more operations at the end as well, as
in 5 + 4 + 3 + 2 + 1, or circle(1) & circle(2) & circle(3).
You know some operators on numbers from your mathematics
studies.  These include addition (written as `+`),
subtraction (written as `-`), multiplication (written as
`*`), and division (written as `/`).  These work for numbers
in CodeWorld just as they do for numbers in mathematics.
That also means they follow the order of operations, and
you can use parentheses when needed to communicate how to
group the operations together.

The other operator you've used a lot is `&`, the "in front
of" operator for pictures.  Even though the values you combine
are pictures instead of numbers, the `&` operator works in
pretty much the same way as the operations you know on
numbers.
You might notice that many of the expressions in the table above
have other expressions inside of them. For example, circle(8),
an expression for a picture, uses 8, an expression for a number,
inside. In fact, this happens all the time. Most expressions are
made of other, smaller expressions, much like how Russian nesting
dolls have other smaller dolls inside.

Just like with the dolls, this is called nesting. Up until now, your programs haven't used too many nested expressions. Instead, if you wanted to apply several transformations to the same basic shape, you have named all of the partially transformed shapes, so that can refer to them in the next equation. Here's a quick reminder how you might define a diamond by naming the simpler pictures it is transformed from.
program = drawingOf(diamond)
diamond = rotated(square, 45)
square  = solidRectangle(4, 4)
Naming everything like that can be tedious, though. If you have a
simple shape, such as rectangle(2, 2), you may not want to bother
giving it a name. You can just describe the shape right where the
name would go, instead.
That looks like this:
program = drawingOf(diamond)
diamond = rotated(rectangle(2, 2), 45)
Or even this:
program = drawingOf(rotated(rectangle(2, 2), 45))
Careful, though! You can avoid naming simple things, but if you nest too much, you get parentheses inside of parentheses inside of parentheses, and pretty soon it's hard to tell what's going on!
Nesting can be used for numbers, too. You can let the computer work out
math for you on numbers, too. When you write math expressions, you can
use + and - the way you normally would. To multiply, use *. To
divide, use /.
Check out this code:
program = drawingOf(design)
design  = rotated(rectangle(4, 0.2), 1 * 180 / 5)
        & rotated(rectangle(4, 0.2), 2 * 180 / 5)
        & rotated(rectangle(4, 0.2), 3 * 180 / 5)
        & rotated(rectangle(4, 0.2), 4 * 180 / 5)
        & rotated(rectangle(4, 0.2), 5 * 180 / 5)
We could have written 36, '72', '108', '144', and 180, instead of
writing math expressions for the angles. But this way, it's very
clear what we are doing: dividing 180 degrees into fifths, and then
rotating a rectangle by each amount. And we don't have to worry
about getting your arithmetic wrong!
Just like in math, you can use parentheses to group expressions, so
3 * (6 - 2) is 3 * 4, which is 12.
Many of the expressions you write will use parentheses -- "(" and ")" -- to group their parts. There are parentheses in all function applications, but they can also be used to group operators. These parentheses are the key to understanding the structure of your code. They always come in matching pairs -- one open-parenthesis always goes with a matching close parenthesis -- and help divide up your code into logical parts.
As you nest expressions deeper, though, it becomes more challenging to match up these parentheses.
A good way to start matching parentheses is to look at each pair as making a ring around the code inside them. If you write the expression on paper, you can complete the ring by joining the edges of the parentheses. You want to do this without crossing the lines.
For instance, these two pair of parentheses:
( ) ( )
can be completed into these rings:
- .-. .-.
- ( ) ( )
- '-' '-'
These nested parentheses:
( ( ) ( ) )
can be completed to form these nested rings:
- .--------------.
- | .-. .-. |
- | ( ) ( ) |
- | '-' '-' |
- '--------------'
For harder cases, there are a few strategies worth knowing for keeping track of parentheses: matching from the inside out, counting, wrapping expressions, and using your tools.
Matching from the inside out is the easiest strategy to match up all the parentheses in an expression. Look at these deeply nested parentheses:
( ) ( ( ) ( ( ) ) )
It may not be apparent which parentheses match at a glance. But you can certainly match some: the parentheses that face each other with no other parentheses in between must match:
- .-. .-. .-.
- ( ) ( ( ) ( ( ) ) )
- '-' '-' '-'
With those matches out of the way, it's easy to see more pairs of parentheses that face each other with no unmatched parentheses between them. If you keep matching what you can in this way, you will eventually complete the match:
-
.--------------------. -
| .-------. | - .-. | .-. | .-. | |
- ( ) | ( ) | ( ) | |
- '-' | '-' | '-' | |
-
| '-------' | -
'--------------------'
When using this strategy, you will draw the smallest rings first, and then fill in the larger rings around them.
The counting strategy is better when you want to find the match for a specific parenthesis. Starting from an open-parenthesis, you will scan forward, counting how many more close-parentheses you need before you've found its match. Each open-parenthesis you find increases the count by one, while each close-parenthesis decreases the count by one. When you reach zero, you've found the match.
Suppose you wanted to find the match for the first parenthesis in this sequence:
( ( ( ) ( ) ) ) ( ( ) )
You would count like this:
- ( ( ( ) ( ) ) ) ( ( ) )
- ^ ^ ^ ^ ^ ^ ^ ^
- | | | | | | | |
- 1 2 3 2 3 2 1 0
The parenthesis where you finally said "zero" is the match for the one you started on. This counting technique lets you find the match for that specific parenthesis without needing to sort through everything in between.
The CodeWorld web site is the tool you use to create your drawings. It also has some tricks to help you keep track of parentheses.
-
Matching pairs of parentheses are always the same color when you look at your code with CodeWorld. So to find the match for a green parenthesis, you need only look for the other green ones. You can see this in the examples of parentheses earlier, if you look for it.
Parentheses on the outside are also drawn larger than those inside. This is a common convention in mathematics.
-
If you move your text cursor next to a parenthesis, that parenthesis and its match will both be highlighted with a box. This helps you avoid the need to do the counting shown above to find the match for a specific parenthesis.
This can help you understand the structure of expressions in CodeWorld when working on the web site. However, it's still a good idea to practice working out pairs of matching parentheses, since they come up all over mathematics.
Of course, in your actual code, there are more than just parentheses. Consider a nested expression like this:
drawingOf(colored(circle(5) & rectangle(1, 2), blue))
Can you identify the two arguments needed by the colored function?
(The first is circle(5) & rectangle(1, 2), and the second is
blue.) How would you figure this out in general? If you can match
parentheses, then you can extend this to diagramming the entire code.
You may remember that when you first wrote function applications, you drew frying-pan diagrams to represent the name of the function on a handle in front, and the inputs in a circle like the ingredients placed in the pan. You can do the same here. However, the arguments that go in each pan may include other expressions, called subexpressions. Those can have more subexpressions, and so on!
This code:
colored(rectangle(5, 10), blue)
can be visualized like this:
-
.----------------------+-----. -
| .--+---. | | - .-------+ .---------+ | | | |
- | colored| | rectangle| 5 | 10 | | blue |
- '-------+ '---------+ | | | |
-
| '--+---' | | -
'----------------------+-----'
In this diagram, you can clearly see that there are two arguments to
the colored function: a picture with its own expression, and the color
blue. If you look closer at the first argument, you'll see that it's
another function application, with two number arguments of its own.
Picking apart the pieces of an expression like this is called parsing, and it's an important skill to build so that you can read and understand code more easily. Parsing is all about answering two questions:
- What form of expression is this? For example, is this a literal expression, a variable, a function application, or an operation?
- What are the subexpressions, or smaller expressions that represent values that are put together by the main expression?
In this example, the form is a function application of the colored
function. The two arguments to the function, rectangle(5, 10) and
blue, are subexpressions.
If the form of expression is an operation, you can draw the diagram a little differently. Operators work exactly like functions, but instead of writing them in front of the arguments, they sit between their arguments (called "operands"). We can represent them with a similar diagram, but need two circles for the left and right operands.
For instance, 5 + 3 can be visualized like this:
- .-. .-.
- | +---+ |
- | 5 | + | 3 |
- | +---+ |
- '-' '-'
Returning to the example that started this section:
drawingOf(colored(circle(5) & rectangle(1, 2), blue))
can be visualized something like this:
-
.---------------------------------------------------------------. -
| .---------------------------------------------+----. | -
| | .-------------. .--------------------. | | | -
| | | .-. +---+ .--+--. | | | | - .---------+ .-------+ | .------+ | | | .---------+ | | | | | |
- | drawingOf| | colored| | | circle| 5 | | & | | rectangle| 1 | 2 | | | blue| |
- '---------+ '-------+ | '------+ | | | '---------+ | | | | | |
-
| | | '-' +---+ '--+--' | | | | -
| | '-------------' '--------------------' | | | -
| '---------------------------------------------+----' | -
'---------------------------------------------------------------'
While this may not seem much simpler, it does make it easier to understand the
structure of the expression. You can see that the entire expression is an
application of the drawingOf function, which has one argument. And you can
look closer at the argument to see what its pieces are.
Often, you want to apply more than one transformation to the same picture. For example, you may want to color something blue, rotate it, and translate it to the right location. To do this, you can nest these transformations together, like this:
translated( rotated( colored(pic, blue), 45 ), 0, 5 )
Just like when matching parentheses, the way to read nested transformations is from the inside out. In this example:
- You started with the picture called
pic. - Then you changed the color of that picture to
blue. - Then you rotated that picture by 45 degrees.
- Finally, you translated that picture up by 5 units.
This might seem unusual at first, since the function names occur in the
opposite order. It might also surprise you that the arguments like blue
and 45 come in the opposite order as the functions they apply to. Just
remember that every transformation starts with the picture described by its
argument. As a result, the starting point is on the inside, and the
transformations are wrapped around that subexpression working from the
inside out, like this:
- .---------------------------------------------------------------.
- | .-----------------------------------------. |
- | | .-----------------------. | |
- | | | .---. | | |
- | translated( | rotated( | colored( | pic | ,blue) | ,45) | ,0,5) |
- | | | '---' | | |
- | | '-----------------------' | |
- | '-----------------------------------------' |
- '---------------------------------------------------------------'
You can write these expressions in the same way, starting with a simple picture, and then wrapping it in function applications one at a time. For example, you could start with a circle, then color it, scale it, and move it, in steps like this:
pic = circle(2)
pic = colored(circle(2), red)
pic = scaled(colored(circle(2), red), 2, 1)
pic = translated(scaled(colored(circle(2), red), 2, 1), 0, -5)
Things get easier when you realize that you don't need to type your whole program from left to right! Here, just like you matched parentheses from the inside out, you typed them that way, too. If you always type your open parenthesis and its matching close parenthesis at the same time, you can never forget one of them. And if you also fill in the rest of the expression when you do, you can think about one change at a time. If you run your program after each step, you will also find and fix your mistakes right away, instead of waiting until you've forgotten when you meant to type.
When you perform multiple transformations in sequence, the order can matter! Explore the notes below to learn more.
!!! collapsible: Translation and rotation.
The rotated function rotates a picture around its center.
That's an important fact to keep in mind when you are both rotating
and translating the same picture. The following animation shows the
same rectangle being rotated and translated in two orders: with the
rotation first, and then with the translation first.
<div align="center"><iframe src="https://code.world/run.html?mode=codeworld&dhash=DygOdzBNSImB7skCyAG5XNg" width=250 height=250 style="border: none;"></iframe></div>

The result you probably expected comes from rotating first, on the
inside of the expression, and then translating that result.  If you
do it the other way around, the rotation also moves the object in a
sort of orbit around the center.
!!! collapsible: Translation and dilation.
The dilated and scaled functions stretch pictures away from
or towards the center. That means that applying these
functions to a shapes that's not located at the center will also
change their position. The following animation shows the same
rectangle being dilated and translated in two orders: with the
dilation first, and then with the translation first.
<div align="center"><iframe src="https://code.world/run.html?mode=codeworld&dhash=DCBe0XAfXQv5mXQI5Vr1S4w" width=250 height=250 style="border: none;"></iframe></div>

The result you probably expect comes from dilating or scaling first,
on the inside of the expression, and then translating that result.
If you translate on the inside, then dilating or scaling will change
the position of the object, by pushing it away, or pulling it toward
the center.
!!! collapsible: Rotation and scaling.
The scaled function stretches pictures along the x and y directions,
but these directions change when that picture is rotated. As a result,
scaling before and after rotation have different effects. You can see
that in this illustration.
<div align="center"><iframe src="https://code.world/run.html?mode=codeworld&dhash=DmwRKdn3UN0NriPkf3SU_Tw" width=250 height=250 style="border: none;"></iframe></div>

You probably expected the result you get from scaling on the inside,
and then rotating the result of that.  This only makes a difference,
though, when the scale factors are different in the x and y directions.
If you are dilating, or scaling by the same factor in all directions,
then it makes no difference whether you scale or rotate first.
To summarize, you usually want your translations on the outside, rotations inside that, and scaling or dilation inside of that, like this:
translated(rotated(scaled(pic, ...), ...), ...)
As you progress, you may want more flexible shapes than just circles, lettering, and rectangles. In this section, you will learn ways to describe more flexible basic shapes to use in your drawings.
To draw more precise shapes, we can use points on a "coordinate plane".

You can include a coordinate plane in your CodeWorld drawings, too, by
using the coordinatePlane variable, like this:
program = drawingOf(coordinatePlane)
The coordinate plane is made up of two directions: horizontal (also
called x) and vertical (also called y). The very center of the screen
is at position zero in both x and y, and can be written as (0, 0). In
general, points can be described by listing two numbers:
- Which number they are above or below on the horizontal line. This is called the x coordinate.
- Which number they are beside on the vertical line. This is called the y coordinate.
Since zero is in the middle, one direction uses positive numbers, and the other uses negative numbers. Once you have these numbers, you can write a point by listing them in parentheses with a comma: the x coordinate always comes first, and the y coordinate always comes second.
Try finding these points on the coordinate plane:
!!! collapsible: (5, 5)
This is in the top right part of the coordinate plane. Positive
x coordinates are on the right, and positive y coordinates on the
top.
<div align="center"><iframe src="https://code.world/run.html?mode=codeworld&dhash=Dm0R63kOAB6q6eoshTPEdWQ" width=250 height=250 style="border: none;"></iframe></div>
!!! collapsible: (5, 0)
This is on the middle right. The y coordinate of 0 places the
point neither up nor down, but directly in the center of the
canvas.
<div align="center"><iframe src="https://code.world/run.html?mode=codeworld&dhash=D9QqfcpFjA-kDFWfSTbPhQQ" width=250 height=250 style="border: none;"></iframe></div>
!!! collapsible: (-5, 5)
This one is on the top left. It's near the top because of the positive
y coordinate, and left because of the negative x coordinate.
<div align="center"><iframe src="https://code.world/run.html?mode=codeworld&dhash=DF0rw2g67WsV9yxQ2Yk0lDw" width=250 height=250 style="border: none;"></iframe></div>
Now you can draw things like sequences of lines by giving a list of points in
the coordinate plane to a function called polyline:
program = drawingOf(zigzag)
zigzag  = polyline([(-2, 0), (-1, 1), (0, -1), (1, 1), (2, 0)])
!!! Lists The square brackets form something called a list. You haven't seen lists before, but they are just what they sound like: collections of multiple things in order. When drawing lines, curves, and polygons, you will place your points in a list (in square brackets) before giving them to the function.
To draw a closed shape, which ends back where it started, you can use polygon
instead. Can you figure out the mystery picture before you run it?
program = drawingOf(mystery)
mystery = polygon(
    [(-3, -4), (0, 5), (3, -4), (-4, 2), (4, 2), (-3, -4)])
If you prefer to fill in your shape, you can use solidPolygon instead of
polygon and you'll get a solid version.
program = drawingOf(mystery)
mystery = solidPolygon(
    [(-3, -4), (0, 5), (3, -4), (-4, 2), (4, 2), (-3, -4)])
There are also thickPolygon and thickPolyline which use an extra
parameter for thickness, following the same pattern as the other picture
functions you've seen:
program = drawingOf(mystery)
mystery = thickPolygon(
    [(-3, -4), (0, 5), (3, -4), (-4, 2), (4, 2), (-3, -4)], 1)
Finally, if you'd like to connect points with a curved line instead of straight
line segments, there are functions called curve and thickCurve for curves
with endpoints, and closedCurve, solidClosedCurve, and thickClosedCurve
for curves that join back to their starting point in a loop. These functions
work exactly like polyline and polygon, but just draw smooth curves instead.
A neat trick is to use the coordinate plane as you write your code. Say you want to draw a butterfly. You might start by writing:
program   = drawingOf(butterfly & coordinatePlane)
butterfly = polyline([ ])
Now run your program, and you have a coordinate plane to measure what
points to use in your shapes. (When you're done, just remove the
& coordinatePlane to get rid of the guidelines.)
No matter which exact kind of line, curve, or polygon you want in the end,
it's usually easier to start with polyline. That's because polyline
shows you exactly where the points you've chosen are, without drawing extra
lines back to the starting point or curving all over the place. Once your
points are in the right place, it's easy to change the function to the one
you want.
You can see what your shape looks like at each step by running your code often. Every new vertex or two is a great time to click that Run button and make sure the shape looks the way you expected.
The last few kinds of shapes you can draw in CodeWorld are arcs and sectors. These are parts of a circle. The can use arcs to describe a smile, or sectors to describe a piece of pie or pizza.
The key to drawing arcs and sectors is using angles to describe which portion of a circle you want to draw. The angles you can use are described in this diagram.

Arcs and sectors are drawn with these functions:
arc :: (Number, Number, Number) -> Picture
thickArc :: (Number, Number, Number, Number) -> Picture
sector :: (Number, Number, Number) -> Picture
The three arguments to the arc function are:
- An angle giving the direction of one side of the arc.
- An angle giving the direction of the other side of the arc.
- The radius of the circle that the arc belongs to.
The order of the first two arguments doesn't matter at all. But the choice of
number does matter! The arc will cover all of the directions between the
numbers you choose. So even though -90 and 270 represent the same direction,
the expression arc(-90, 90, 5) covers all the directions to the right of the
y axis, since those are the angles in between the numbers -90 and 90. But the
expression arc(270, 90, 5) covers the angles to the left of the y axis,
because those are the numbers between 270 and 90.
To see a half circle with radius 5 drawn on the corrdinate plane, use this code:
program   = drawingOf(halfCircle & coordinatePlane)
halfCircle=arc(-90,90,5)
Following the same pattern as most other shapes, the thickArc function is
just like arc, except that you give it one extra number representing the
thickness of the line to draw.
To draw half of a tire, use this code:
program   = drawingOf(halfTire & coordinatePlane)
halfTire=thickArc(-90,90,5,4)
Notice the thickness is split between both sides of the arc.
The sector function is sort of like the
solid variant of arc, in that it draws one slice of a solid circle. That
looks like a piece of pie or pizza.
To draw a slice of pizza, use the code:
program   = drawingOf(pizzaSlice & coordinatePlane)
pizzaSlice=sector(0,45,5)
You've already seen how to use the colored function to transform a picture
by changing its color. However, up to this point, you've been limited to
choosing a few colors known to the computer: namely, red, yellow, green,
blue, orange, brown, pink, purple, white, black, and gray.
Now it's time to explore some new functions that you can use to customize
your colors.
light :: Color -> Color
dark :: Color -> Color
The light and dark functions change the shade of a color. For example,
dark(green) is still green, but a darker shade. You can apply these
functions more than once, so dark(dark(green)) is an even darker shade.
bright :: Color -> Color
dull :: Color -> Color
The bright and dull functions change the amount of color. So, for
example, dull(blue) is a muted and grayish blue, but bright(blue) is
vivid and colorful. Again, you can apply them more than once, so
dull(dull(blue)) is almost completely gray, but with a blue tint to it.
translucent :: Color -> Color
The translucent function makes a color partially transparent, so you can
see through it to the pictures that you've placed behind it using the &
operator.
mixed :: [Color] -> Color
Finally, you can mix colors using mixed. If you want a reddish brown, for
example, you can use mixed([red, brown]). Just like the polygons you used
earlier, the mixed function receives a list in square brackets for a
parameter. You can give it any number of colors to mix together. You can
even mix colors in different proportions by listing the same color more than
once, as in mixed([red, red, brown])
Several of these functions can be used together. These let you describe very detailed colors, like:
mixed([light(dull(yellow)), bright(green)])
!!! collapsible: What's the difference between bright and light?
The functions bright and light sound very much alike, but they
don't mean the same thing. light makes a color lighter in shade,
so it's closer to white. But bright makes it more vibrant and
colorful - further away from gray.
You've just learned how to customize your colors by using transformations
like light, dark, bright, or dull. These functions start with a
base color, and modify it. But you can also describe colors using
numbers. The schemes you can use to describe a color using numbers are
called color spaces.
RGB :: (Number, Number, Number) -> Color
The RGB color space describes colors by the amount of red, green, or blue light that is mixed together to produce that color. This might be surprising, but any color can be produced by mixing those three! Because of this, they are known as the primary light colors.
The proportions you provide for each primary color are numbers between 0
(meaning, no light of that color at all) and 1 (meaning, as much light of
that color as possible). The color white could also be written as
RGB(1,1,1) meaning that it contains as much light as possible in all
three colors. black, on the other hand, is RGB(0,0,0), meaning it is
the color you get from no light at all.
The RGB colors can be visualized as a cube, where the amount of red, green, and blue light is measured along each edge.

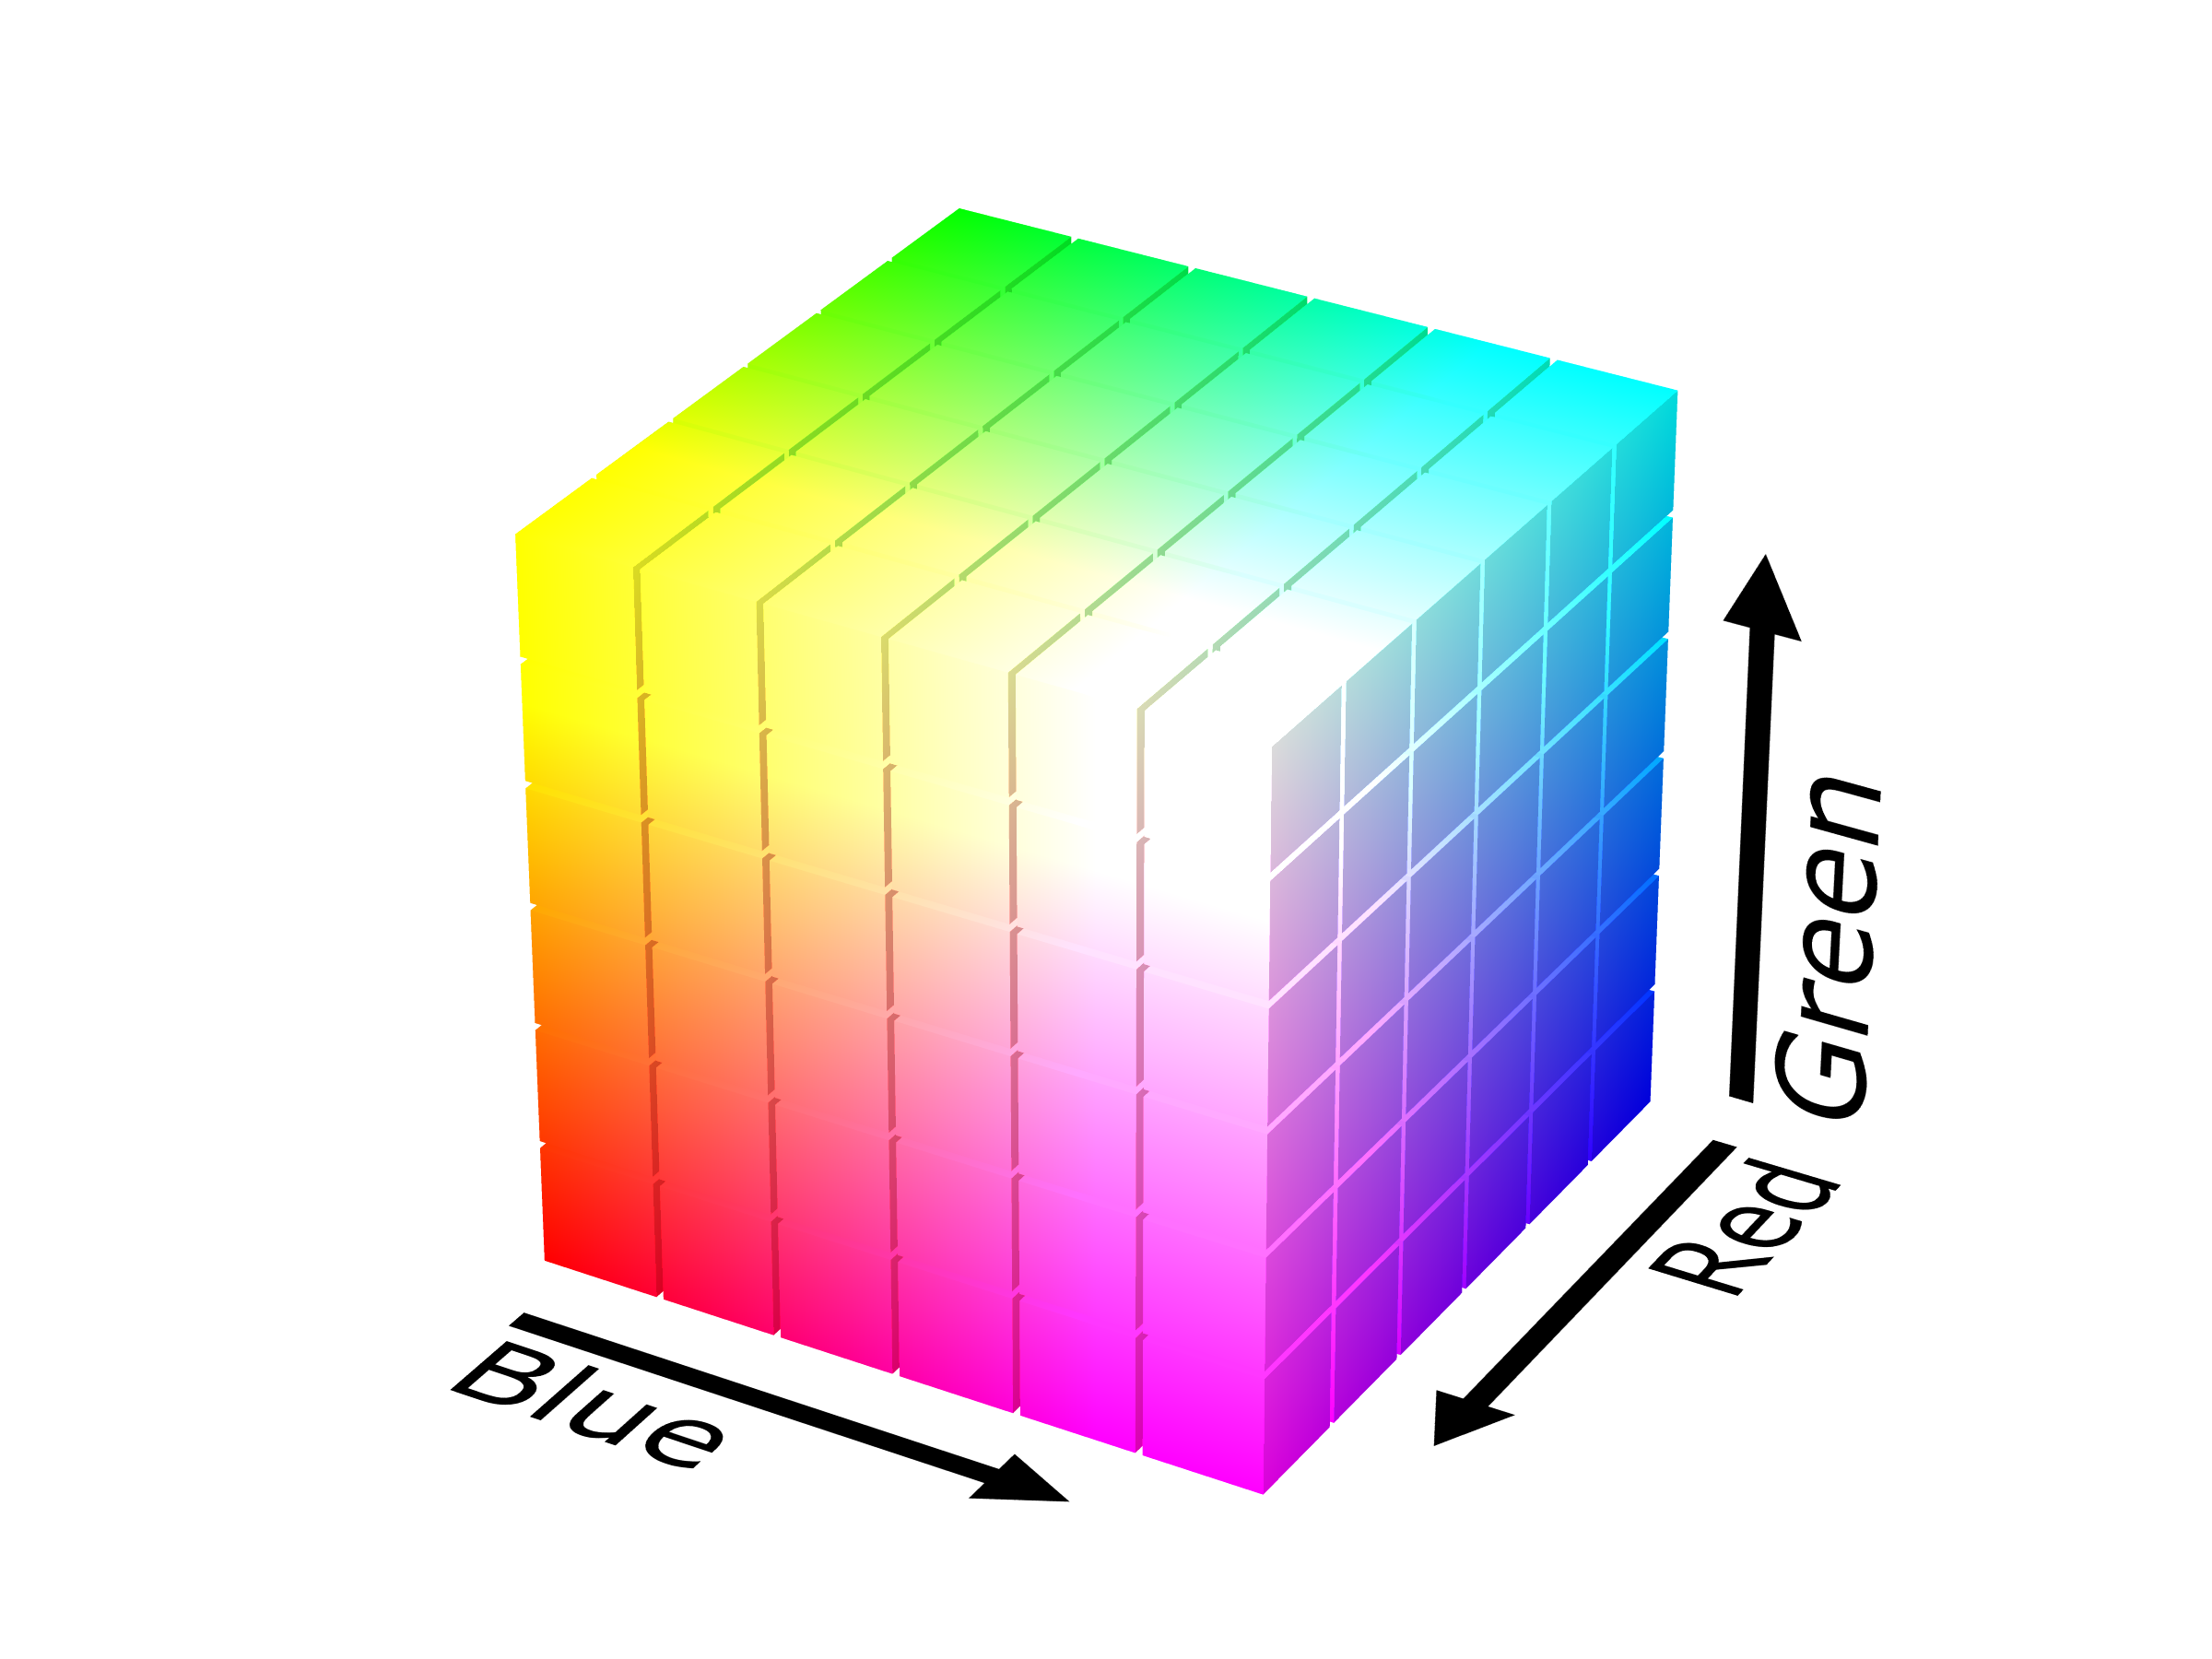
!!! collapsible: Using RGB colors from other places You can often find the RGB values for colors on the internet. You'll need to know, though, what scale they are using. For historical reasons, RGB forms are often given on a scale from 0 to 255, instead of 0 to 1. To use these in CodeWorld, you'll need to divide the numbers by 255.
For example, Wikipedia [will tell you](https://en.wikipedia.org/wiki/Forest_green)
that the RGB values for "forest green" are 34, 139, and 34.  To describe
this color in CodeWorld, you could write `RGB(34/255, 139/255, 34/255)`.
HSL :: (Number, Number, Number) -> Color
A second way to describe colors is using the HSL form. In this form, you first provide the hue, which is the direction of that color on the color wheel, as an angle. A hue of 0 degrees is a shade of red, and positive angles move from there through yellow, green, blue, purple, and back to red again.

The second number is saturation, which says how much color there
is. For this number, 0 means a shade of gray with no color at all, while 1
means super-colorful. You may recall that bright is a function that
increases the saturation of a color, and dull decreases it.
Finally, luminosity, describes the lightness of the color. A luminosity
of 0 is always black, and 1 is white, regardless of the other numbers. You
might remember that light and dark are functions that change the
luminosity of a color. An ordinary medium-tone color has a luminosity of
about a half, which you can write as 0.5 or 1/2.
RGBA :: (Number, Number, Number, Number) -> Color
Finally, a variant of the RGB color space is called RGBA.
This function takes the same red, green, and blue proportions as RGB, but then another number called the alpha, describing how opaque the color is. An alpha of 0 is completely transparent, so you cannot see the picture at all. An alpha of 1 is completely opaque, so the shape can't be seen through at all. A partially transparent shape would have an alpha number somewhere between zero and one.
The RGB, HSL, and RGBA functions are the most powerful tools you have,
but also the hardest to use. Using them too often makes your code not only
harder to write, but also harder for others to read. So if you just want a
dark blue, try dark(blue) first. But if you definitely need a precise
color, or if you're having trouble describing the color you want with simpler
expressions, these functions are available to you.
You've now got the skills needed to draw simple pictures. But how do you start something more advanced? In this section, you'll learn some techniques for organizing your work on larger and more involved projects.
Ultimately, the way you describe everything in CodeWorld is by breaking it down into simpler pieces that can be described on their own. For example, when you define a picture of a car, you might write:
car = body & hood & frontWheel & backWheel
You can then proceed to define each of those pieces separately. This works fine when your entire pictures is made of a handful of shapes. But a more advanced picture might include 50 or more separate shapes! Listing them all in one large definition isn't wise.
Instead, you can break down shapes at several levels. For instance, an entire picture of a space scene may involve four or five main parts -- such as a space station, planet, alien, rocket, and stars. But each of those may also involve several pieces -- an alien may consist of a head, body, arms, and tentacles. Some of those might be further broken down into parts -- the alien's head into an eye (just one, because it's an alien), a nose, a mouth, and a chin. You might even break down the eyes into two parts, as well: the whites, the iris (which is the colored ring), and the pupil (the black hole that light passes through).
The strategy for building more complex pictures is to just keep going. If a part of your picture is a simple shape like a circle or rectangle, then you can stop here; but if not, you have to break it down one more level.
You could end up with something like this:
scene = alien & planet & spaceStation & rocket & backdrop
alien = head & body & arms & tentacles
head = nose & eye & mouth & face
eye = pupil & iris & white
backdrop = stars & space
...
And you're just getting started! This gives the following partial decomposition of the space scene.
-
scene -
| -
.---------+----------+---' '--------+---------. -
| | | | | -
alien planet spaceStation rocket backdrop -
| | -
.-' '---+----+-------. .----' '-. -
| | | | | | - head body arms tentacles stars space
-
| - .-' '-+------+-----.
- | | | |
- nose eye mouth face
Finally, though, you get to pictures that are simple enough to define with a single shape.
...
pupil = solidCircle(1/2)
iris = colored(solidCircle(2/3), brown)
whites = colored(solidCircle(1), white)
face = colored(solidCircle(3), purple)
space = solidRectangle(20, 20)
Finally, you will need to add translations to the parts to move them to the right part of the screen. It takes some persistence, but eventually, you can create an intricate and impressive picture in this way.
If you try to write a very large program all at once, though, you're bound to get frustrated and have a bad time. Instead, you should try to write your program so that you can look at it one piece at a time, and see it take shape. If you follow the top-down design process, you will end up with a lot of undefined variables that stop you from running your code!
To prevent this, you can use stubs. A stub is an incomplete definition of a variable, that you write as a placeholder for the true value later on. Let's revisit the alien above. You may start by writing:
program = drawingOf(scene)
scene = alien & planet & spaceStation & rocket & backdrop
At this point, there are five undefined variables: alien, planet,
spaceStation, rocket, and backdrop. Instead of immediately defining
all of the these variables (which is a lot of work!), you could extend your
program into this one, which you can run right away.
program = drawingOf(scene)
scene = alien & planet & spaceStation & rocket & backdrop
alien = blank
planet = blank
spaceStation = blank
rocket = blank
backdrop = blank
If you run this program, you may notice that you don't see anything.
That's because all the parts of your drawing are defined to be blank.
In CodeWorld, blank is a picture of nothing at all!
blank :: Picture
It's the first place you'll turn for a stub. Now that you can run
your code, you can go back and start filling in the blanks --
literally -- with drawings of each part.
Sometimes, a stub isn't just blank, but a simpler version of the picture itself. You might have a great idea for how to draw a rocket and an alien planet with craters and rings. But for now, you may consider defining the rocket to just be a rectangle, the planet to be a circle, and so on.
program = drawingOf(scene)
scene = alien & planet & spaceStation & rocket & backdrop
alien = scaled(circle(1), 1, 2)
planet = circle(3)
spaceStation = rectangle(10, 4)
rocket = rectangle(2, 8)
backdrop = blank
Now you can start to fit these pieces fit together in the larger picture. There's no use building a complex space station if there's no room for a space station in your drawing! With these simple shapes in place, you can add translations to lay out the main parts in your entire drawing, and get a rough idea of how they work together.
program = drawingOf(scene)
scene = translated(alien, 3, 7) &
        translated(planet, -2, -5) &
        translated(spaceStation, -3, 3) &
        translated(rocket, 6, 3) &
        backdrop
alien = scaled(circle(1), 1, 2)
planet = circle(3)
spaceStation = rectangle(10, 4)
rocket = rectangle(2, 8)
backdrop = blank
This becomes a rough sketch of your final drawing. Now that you can visualize how everything fits together, you can more confidently dig in and fill out each of the pieces.
It's common in your drawings to want more than one of the same shape. You might want an entire sky full of stars, or a field of flowers, or a flock of birds. A common mistake, in this case, is to write your code like this:
bird1 = ... some code ...
bird2 = ... the exact same code ...
bird3 = ... the same code again ...
You don't need to do this! Once you have a definition of a picture, you can use that variable any number of times in the same program, like this.
bird = ... some code ...
flock = bird & translated(bird, 2, 1) & translated(bird, -3, 2)
This is an important part of how we build larger programs, and computer programmers call it reuse. They sometimes talk about a rule of thumb called DRY, which stands for "Don't Repeat Yourself". Any time you are tempted to type the exact same thing more than once, you can consider defining a variable, instead, and just using the variable several times.
Sometimes it's not that simple, though. Let's look at a more complicated situation. Imagine you've written a picture of three fish like this:
program = drawingOf(fish1 & fish2 & fish3)
fish1 = translated(sector(30, 330, 2),  4,  2) &
        translated(sector(-90, 90, 2),  1,  2)
fish2 = translated(sector(30, 330, 2),  1, -3) &
        translated(sector(-90, 90, 2), -2, -3)
fish3 = translated(sector(30, 330, 2), -2,  1) &
        translated(sector(-90, 90, 2), -5,  1)
If you run this program, you can clearly see three copies of the same
fish, but the code isn't identical. There are different numbers for
the translations. The problem is that the code uses the same
translated functions for two things: arranging the parts of each
fish, and arranging the fish on the screen. In order to reuse the
same variable for a fish, you would first need to separate these
translations.
Inside of a fish, the important relationship is that the tail is 3 units to the left of the body. You can start, then, by defining fish with just that part of the translation.
fish = sector(30, 330, 2) &
       translated(sector(-90, 90, 2), -3, 0)
Now that this is done, you can translate each entire fish to the desired point on the canvas.
program = drawingOf(school)
school = translated(fish, 4, 2) &
         translated(fish, 1, -3) &
         translated(fish, -2, 1)
fish = sector(30, 330, 2) &
       translated(sector(-90, 90, 2), -3, 0)
This program correctly follows the DRY ("Don't Repeat Yourself") rule of thumb, because it says everything exactly once. When you are trying to reuse variables, it's important to translate the entire variable when possible, and use transformations on the parts only to arrange the parts relative to each other.
You may be wondering why computer programmers follow the DRY ("Don't Repeat Yourself") rule of thumb. There are a few reasons.
- It can make your code a lot shorter. Shorter code is easier to read and understand, and also makes it easier to notice and fix your mistakes. There are just fewer places for mistakes to happen. When you reuse the same code, once you've written it correctly once, it's correct everywhere. If you change your mind about what a part should look like, too, you only need to change it in one place.
- There is a more important reason, though. It's easier to create ambitious things in code when you have more powerful vocabulary to do it with. Once you have a word for a fish, you could more easily try out different arrangements of fish. You can think about ideas like making a family out of dilated fish with different sizes. You might have trouble even expressing the code for ideas like that if you have to build new fish each time!
What's going on here is called abstraction. Abstraction is all about dealing with higher level ideas, and freeing yourself from thinking about technical details over and over again. Abstraction is thinking about aliens, or butterflies, or fish, instead of rectangles, circles, and lines. Of course, the computer still needs to know where to draw the rectangles and circles and lines to make an alien, but you can say that once inside the definition of your simple pictures and there's no need to worry about it when thinking about bigger questions.
!!! collapsible:How is abstraction related to top-down decomposition? There's a close relationship between the ideas of abstraction and top-down decomposition. Top-down decomposition is about thinking about the higher-level pieces of your drawing first. Abstraction is about thinking about the higher-level pieces more often. So both top-down decomposition and reuse of variables are techniques for abstraction.
One really important step toward abstraction is the separation of
concerns. Some details of your pictures are essential to the idea
of the picture but others, like the position in the drawing, can change
without changing the idea. Separation of concerns means that when defining
a variable like fish, you should include the things that are essential to
being a fish, but not things about how the fish fits in your larger drawing.
A common mistake would be to define fish as a picture of a fish in the
top right corner. When you wanted a fish in a different place, you would
then need to translate it relative to that position in the corner. You
might even end up with something like this.
fish = translated(sector(30, 330, 2), 4, 4) &
       translated(sector(-90, 90, 2), 1, 4)
fish2 = translated(fish, -10, -5)
fish3 = translated(fish2, 7, -4)
fish4 = translated(fish3, 0, 10)
This does reuse the definition of fish, but it's hard to tell where these
fish will appear on the page. A better pattern would be to define the
variable fish to draw a fish in the center of the picture, and then
translate that each time.
fish = sector(30, 330, 2) &
       translated(sector(-90, 90, 2), -3, 0)
fish1 = translated(fish, 4, 4)
fish2 = translated(fish, -6, -1)
fish3 = translated(fish2, 1, -5)
fish4 = translated(fish3, 1, 5)
In this example, it's much easier to see where the fish are located in
the drawing. The variable fish is in the center, and each of the
four specific fish are translated from there.